Create Calculated Field with REST API
The REST API is a great option for a lot of operations in SharePoint Online. Today I am going to demonstrate how you can create a calculated field in a list with a Power Automate flow.
Inspiration
This question from marial16:
I have created a flow that creates Lists in SharePoint. One of the columns is calculated.
I know the type of the column, but is there a way I can automatically create the calculation itself?
Power Users Community thread: Create calculated field with http request.
Fields method
Microsoft has some great documentation about the REST API. This documentation has a lot of examples on interacting with lists, items and fields. Typically when you want to create a new field the Fields method is your best option.
However, in this instance it is a bit more complicated. We also want to include a calculation with a formula in the field.
Metadata and FieldType
After some researching and network tracing in the developer toolbar I figured out that it would be useful to add the SP.FieldCalculated metadata. I also decided to add the Outputtype attribute to the request. With the Outputtype attribute you can set the data type of your calculated result. Here is the full list of SPFieldType Enum items and its related numbers.
Setting the scene
In this example we have a SharePoint Online list with two fields. Both fields are of type number and are called Quantity and Cost. Our goal is to create a new calculated field which multiplies the Quantity with the Cost and stores the value in a new field called TotalCost.
Flow setup
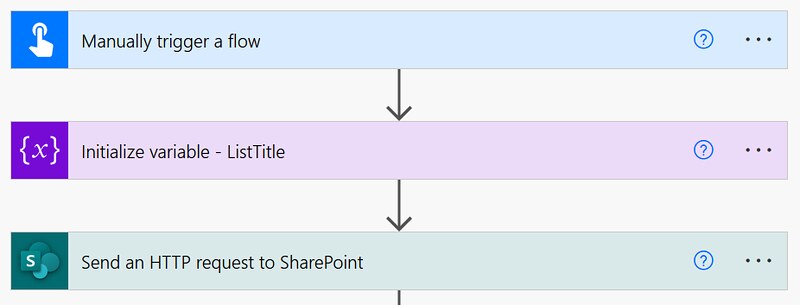
1. Add a Manually trigger a flow action.
2. Add a Initialize variable action (optional).
This step is optional. You can also add the title of the list directly to the URI field in the Send an HTTP request action.
a. Provide a Name, I used ListTitle
b. Select String as type
c. Provide a value. I used Calculation List (the title of my list)
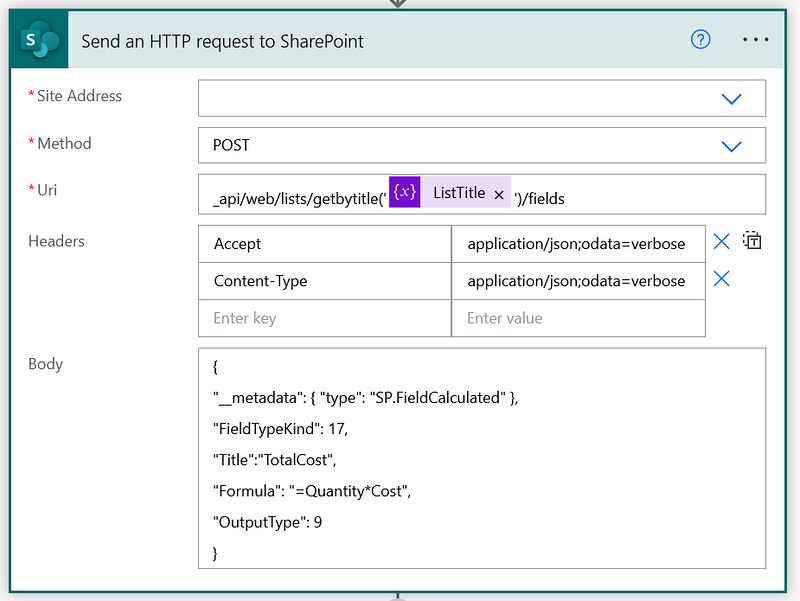
3. Add a Send an HTTP request to SharePoint action.
a. Select your preferred site in the Site Address
b. Use the POST method
c. Use the URI from the code snippet below
d. Use the Headers from the code snippet below
e. Use the Body from the code snippet below
That is it for the setup of this example.
When your run the flow the end result should look like in the screenshot below.
If you don’t see the field yet in your view make sure you select it in the show/hide columns section.
Gotchas
In some cases you need to escape some characters of the formula to make the json in the body of the request work. Azure McFarlane showed me an example of that today. For example a quotation mark character can be escaped with a backslash character.
This seems to work. I escaped the double quotes within the formula with backslashed and removed two closing parentheses. I also added the single line of text (2) as outputtype. pic.twitter.com/fDxatEnlBk
— Dennis (@expiscornovus) August 16, 2022
Below is a code snippet of that example where the quotation mark characters are escaped.
Happy testing!


